Friday 28 September 2012

My Mate is 65 - she'll love me for broadcasting !!


 An extra post today but I am in for a lovely weekend so don't know when I'll get around to posting again.  Going to Port sunlight tomorrow to the Happy Stampers Northwest Show and I have a stall at a fair on Sunday in Southport.

I made this for one of my very oldest friends who also makes cards.  I made it a while ago but she had her birthday on Wednesday so I reckon it is safe to post now.
Numbers I bought from a garden centre of all places
20 x 20 white pearl card
white vellum
box out of same card to fit.
19.5 x 19.5 white peal card
18 x 18 topper also in white pearl card.
little leaf stamp that I found in my stash that goes with the leaves on the main stamp,
Clarity montage butterfly stamp
Clarity butterfly stamp to match
another butterfly stamp - think this came with craft stamper magazine - a long time ago.
Versamark
Weathered wood distress ink
Gold  and clear embossing powder
spellbinders dies
cosmic shimmer white pva glue


 I took the 19.5 square and distressed the edges with weathered wood. I then added the "pearls" with cosmic shimmer and left overnight to set.  I stamped
the montage three times in versamark and gold embossed I then did another one on vellum.
I cut these up and decoupaged. I made two more butterflies with the vellum, embossed these too and cut them out.  I used the Serif programme to make the round sentiment and printed onto pearl paper and " caught" with embossing powder as it came out of the printer. I then distressed too
I mounted this on to a circle of card and added the numbers.
I cut out a fancy circle of pearl card and distressed.  I stamped all around the edge of the top most layer with versamark and embossed with clear powder. I then distress the whole card and stuck it together.
I cut a strip of pearl card to go over the top of the box, and then stamped around the edge embossed and distressed as I had already done on the card.  I stamped three butterflies, embossed in gold and just added a little colour with the distress ink and a brush.

I printed out a nice verse on the insert and then stamped the  butterfly montage on the spare sheet and randomly place some butterflies .

I hope you like it - I know my friend did

spare frame

Marianne Die
poinsettia die
Christmas sentiment stamp - circa designs
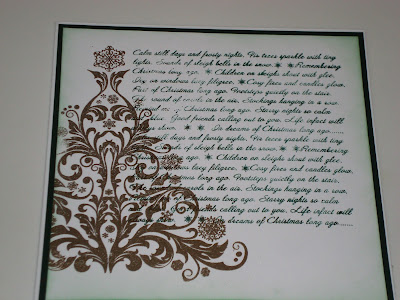
baroque Christmas tree - indigo blu
gold embossing powder
versamark
red , green and white card
black pearl


I was sat with my friend trying to make a fancy topped card with this die as we had seen them at a show.  Anyway before she left with the die I got a couple of fames cut for myself.

I carefully inked with versamark all around the frame and embossed with gold powder - it took a few attempts to make sure it was all done. Added the sentiment and embossed that too.

I made the flower with red card and did some more in green for leaves - they don't really show very well in this photo (I'll never make a photographer LOL)

It all looked a bit like there was something missing so I used parts of the tree in the corners.


Thursday 27 September 2012

gold & white poinsettia/reindeer

free stamps from a mag
tabbyKat designs Christmas script stamp
Marianne die poinsettia
white dl card (this is what I save from the bottom of an A3 card when I make a 20 x 20 card) it opens sideways not longways.
White vellum
gold mirri
gold embossing powder
versamark


I stamped the script onto vellum with versamark and embossed with gold.
I added the reindeer on top and again embossed, cut it into a tag shape and mounted onto gold mirri cut slightly larger.  I used stick and stay to mount but only sprayed randomly so it gives a shadow effect.
I cut out the flower in vellum and touched the edges with versamark and embossed.  I added a pearl gem to the centre.I stamped the base card in two opposite corners and mounted the tag at a jaunty angle

Wednesday 26 September 2012

parcel & bauble mini cards


Stamps by Inkylicious
cranberry Adirondak
Bottle green adirondak
a little holly stamp - found in my stash can't remember where from
white card
promarkers

stamped the parcel and coloured in parts of the stamp with promarkers cut around it and distressed with the cranberry, mounted onto a square card also distressed with the cranberry. and mounted onto 10 x 10 card.

Stamped the round stamp with bottle green, cut out with a spellbinder die coloured and distressed as above. mounted onto a square card that I had stamped in the corners with the holly.  I didn't distress this card but went around the edge with a promarker

Tuesday 25 September 2012

PINK RETIREMENT


Base card 20 x 20
pearl card 19 x 19
pearl card 18 x 18
silver mirri
extra pearl card for sentiments and strip
flower stamp by Dimension Forth
white vellum
silver embossing ink
versamark
antique rose distress ink
spellbinder dies
spellbinder embossibilty folder
Martha Stewart punch
pearl gems

I started with the 18 x 18 card and I wanted to emboss it so I had to cut it to fit into the folder as I only have a cuttlebug and it wouldn't fit.  I then distressed with the pink ink.I joined it back together and covered it up with a piece of mirri and a piece of pearl card that had both been cut with the punch and I distressed the white strip.
I them made the flowers by stamping them out with versamark and embossing with silver.  I then added the pattern on them with the  pink ink and added more colour to the reverse of the vellum when the ink was dry on the patterned side. I printed the sentiments onto some pearl card (after mega fights with my new printer that isn't a patch on my old one)  I covered with embossing powder as it was coming out of the printer and the ink was still wet to catch it.  I made faux nesties out of mirri and mounted it on the card.

I made a box to fit and added the name to one side, I inked up a strip and stamped with a stamp out of the flower set, and added another flower.   I really enjoyed making this card as it is a mix of allsorts.

Monday 24 September 2012

A penny car not a penny farthing

Brown card 14x 14
Lighter brown base card 15 x 15
white card cut into circle with a die
Clarity car stamp and scrabble letters
some twine
2 "buttons"
flitter glue
copper guilding flakes
frayed burlap distressing ink


I cut out a white circle of card and distressed with the distressing ink.  I stamped the car with glue and added flakes. I then edged the rim of the circle with more glue and flakes. I added the boxes top and bottom with glue and then the flakes - I did the letters after to be sure that the glue didn't dry.

I threaded 2 pennies onto the twine and wrapped around the back of the brown card before mounting onto the base.  the car is mounted with foam tape.

Sunday 23 September 2012

BIRTHDAY COGS


 Hi There - seems a while since I was on here but I've had yet another busy week with another to follow this week. I am also in the middle of scanning in old family photos  and try to do some of the family tree AND SERIF CRAFT ARTIST PROCESSIONAL 2 has arrived so have had a little play but not much yet. I have one or two cards to post so I'll do them today and put them on the schedule

I had a lovely day on Friday - I went over to Inspirations at Preston to meet Jo Rice and watch Kay from Indigo Blu - needless to say I bought some more guilding flakes.

20 x 20 cm white card
15 x 15 black card
9 4 x 4 black squares
9 4.5 x 4.5 silver mirri
flitter glue
guilding flakes - royal peacock
black archival
cogs stamps from Kanban
scrabble letters from Clarity
some "buttons" made by a friend if you zoom in you will see why the quotation marks ha ha

I stamped the black squares with flitter glue and then added the guilding flakes.
mounted onto the silver mirri square and mounted that onto the large black card.
I stamped the squares down each side and added the letters.


Monday 17 September 2012

Noel & frosty the snowman

Clarity Noel Framer and the miniature Christmas set.
Denim Adirondak
Weathered wood distress ink
Promarkers.

card size 20 x 20
background 19.5 x 19.5
blue mount 15.5 x 15.5
topper 15 x 15

I used low tack tape to put an edge around the topper, used a piece of torn paper to create a hill mask ( I made this wide enough to cover the background too).  I brayered a hill with weathered wood and then as yesterday's post lined up the topper and mask on the background and then removed the topper to add some sky to the background.

I stamped Noel so that the O was across the hill in denim.

I added some trees hither and thither and then put frosty in the O.  I used a promarker for his hat and scarf.

I removed the edge and then using midnight blue and a fine nib on my promarker and drew a squiggly  line around to form a frame. mounted the topper onto the blue card then the background and then onto the main card

Sunday 16 September 2012

Noel & Robin redbreast

 Materials

Clarity Noel Framer stamp and Christmas miniatures
Denim Adirondak
Weathered wood distress ink
promarkers


I cut two pieces of white card 19 x 19 and 14.5 x 14.5

I ripped a piece of copy paper to make the "hill" and used this as a mask.  I brayered the sky with weathered wood ( I think it has a more wintery feel than stonewash adirondak but is not as dark as Denim)

I then just layed this on top of the big card, lined up the mask and then removed the small card so that I could then brayer a fainter sky and still line up the hill

I stamped the Noel so that the O was across the hill.

I added some trees on top of the hill and behind the hill using the same hill mask and then added the little robin.  I coloured him with promakers and added another tag ready for my sentiment, mounted this onto blue card, then the larger card and then finally onto a 20 x 20 card.


Saturday 15 September 2012

Snowy house


materials

Clarity house stamp and offset holly corner
Denim Adirondak
midnight blue pro marker
Blue and white card
glitter
quickie glue pen


This house stamp ends just under the house but I inked it up and then "cleaned  off" the bottom of the frame with a wet wipe and a paper towel before I stamped it.  This left a border down both sides and across the top, I have extended it to form a frame.  I used the glue to cover the roof and draw over some of the lines that form the ground and then added glitter for a bit of bling.

I mounted onto blue card and then onto a 20 x 20 card that I stamped in the corners .

I added a tag but without any sentiment.  I can then add a sentiment to order eg Merry Christmas  Mum & Dad, Gran whatever!

I aim to do some more of these so that they will be easily customised whilst I am at my fairs or as orders come in.

Friday 14 September 2012

More Baroque

I am going with a new layout for my blogs - I will see how it goes.

Materials

Script stamp from tabby kat designs
Baroque tree from Indigo Blu
Bottle Adirondak
Versamark
Detail Gold embossing powder

This is a really simple card I just stamped the script in green and then the tree with versamark and embossed it .  I inked the edges and mounted onto green mirri card.


Thursday 13 September 2012

Baroque Tree

Just a simple card I got a new stamp from Indigo Blu   when I went to the show in Leigh and as yet haven't had time to play!!

I just plainly stamped with moss distress ink and added a sentiment in the same colour.  I highlight the top star with a quickie glue pen and added just a touch of red glitter and mounted on red mirri card.

This is a beautiful stamp that I know I shall be using again .

Wednesday 12 September 2012

Calm still days

The background was stamped with cranberry adirondak and a large stamp that I think is from TabbyKat designs but not too sure.  It is a Christmas rhyme.  I over stamped the reindeer with versamark and embossed in gold.
I just round around the edge of the card with the cranberry and I mounted this onto a slightly larger piece of card that I distressed with cranberry .  I mounted this onto a yet another piece of card that  I had stamped in the corners with another of the free stamps and again embossed in gold. I roan round the edges in cranberry again to match and then mounted onto a card.

Tuesday 11 September 2012

Let it snow

Just another simple card

 I have used two stamps from Clarity and denim adirondak.  I edged the topper with stonewash adirondak as the denim was too dark and mounted onto plain white card . More easy cards for my stall.

Monday 10 September 2012

green & gold

 Hi I'm here again - finally - been busy doing some orders but got caught up now so made a few more little christmas cards for my stall.

I got one of my craft magazines at the weekend and it came with some free stamps.

I stamped the reindeer and the tree in bottle green adirondak.
I went over parts of the designs with a quickie glue pen and embossed with gold.

I stamped the sentiment - from the same set of stamps and embossed that in gold too.

The holly stamp is from Clarity and I stamped in bottle green again and then just added a few red berries with a promarker.


I inked around the edges with cardinal red adirondak and mounted onto plain white card.

Friday 7 September 2012

workshop homework

I attended a workshop on Tuesday with Maria Simms who showed us a card that was to be our homework.  This is my take on it so I take no credit for the layout or the idea.


It is an offset gate-fold card.  I cut two panels of white card, brayered with cloudy blue adirondak.
I then picked up some stonewash from the splodgemat and repeated with denim and distressed the edges also with denim.  I stamped with a white brilliance inkpad but it was too pale so I embossed with white embossing powder.  I added some white webbing across the middle.  Stamped and silver embossed a large clock-face and cut into two parts one for each side.  The leaves are die cuts from a cheery Lynn design and the flowers were made using stamps from Dimension Forth.

Thursday 6 September 2012

may peace be your gift

Morning all,

I have been at it with the splodgeaway mat again - I love it.

I took a square of white card  and embossed snowflakes randomly with versamark.  I tipped on the clear powder only to discover it was White !! never mind it still gives a nice finish.

I brayered with stonewash adirondak and then used a blending tool and denim for the edges.

I stamped the clarity stamp in blue and cut around it. I mounted on to navy blue cardstock, mounted the whole thing on navy and then added to a white square card.

Off to craft club this afternoon - wonder if I'll manage to make anything or will I be spending the afternoon chatting. ha  ha

Wednesday 5 September 2012

Xmas tree


Just a short little post today - I have been so busy I don't know where the time is going I can't believe we are already in September.

These are just some little sets of cards I have made for Christmas.

It is just a small piece of white card put through an embossing folder with a memory box die Christmas tree cut in mirri card on top.

I went to a workshop yesterday and we made some lovely cards, but as they were not my ideas I don't feel that I have the right ot post them on here.

Hope to get some proper cards posted soon x

Sunday 2 September 2012

I'm busy

This is the final card from the ones I made the other day.  I have used this stamp loads as the image usually sells!!

I have used some soft feel card that I got from Anne Marie designs when I went to the Leigh show last Sunday.  I bought it to use as bases for cards as Tim had sold all his supersmooth, so I have been preserving what stock of this I have left for stamping, but I thought I use it for the middle of this card just to see what happens.  I distressed with vintage photo and stamped the image with the same ink.  I used promarkers to colour the image and the acted in a very strange way and it looks all mottled but I quite liked the look for this image, especially the chair - it looks well lived in (haha) added some more beer mugs randomly for a background.

Saturday 1 September 2012

old car

I have to say that I find myself using old cars and stuff a lot for men - aren't they hard work to make cards for?

I used the same mask as yesterday but I started with a piece of grey paper from a Tim Holtz pad that I have had some time.  I distress with slate adirondak and then through the mask with pitch black adirondak. I cut a shape with the cuttlebug from another piece of the paper and stamped in black with archival ink.  the whole thing looked a bit bleak so I thought I would colour the car red to give it a lift  but didn't really have any promarkers quite the right colour.  So once again (thanks Tom) I put a little aged mahogany and victorian rose on my splodge away mat and between these two and some of the black that was already there I coloured in the car with a brush.