Monday, 11 January 2016

groovi dt samples - Annabel& Laurel

Here I am with another sample   I decided to make something with Laurel but wanted to put something in her hands - Martini's seemed a good plan - utilising the capital Y & T from the letter section of the plate mate   ---I think it works quite well so here she is celebrating with Annabel  


I used the laurel accent to create a frame then added some of the smaller laurel flowers around the bottom.  

The corner pieces were created using one of the large laurel leaves and then I did some piercing and snipping.

I used a gelli plate print from my stash  for the background 


Sunday, 10 January 2016

groovi dt samples - stater kit

It's Sunday evening and I have been trying to blog the rest of my samples all week without success!

So I am going to try to do them now and schedule a few - hope fully get them all in this week.

We are off to bonny Scotland for a few days tomorrow - the weather forecast has changed for the worse so we might get snow - but I hope not I am rubbish at driving in snow,  
I have however just packed up my groovi stuff to take with me!!!


I made this doing the trees on a piece of parchment and added a few hills then I used the full stop from the plate mate to create a border   I cut it out but it looked a bit lost so I got another piece and drew a pencil line around the edge then used the / plate mate and line it up along the pencil line.  from the back.  when it was done I just rubbed out the pencil line.


\


Then came the tricky bit - lining up the hills with the ones I had already put on the top piece - without the top piece being adhered!

after much faffing about I managed it I didn't want to duplicate the hills on the bit that was under the top piece if you get my drift.


Added a little white work and  mounted it on some printed paper with brads 

Thursday, 7 January 2016

Groovi dt samples - White cliffs of Dover


Finally got around to writing a blog about this card.

I was watching a programme on the telly and it showed a shot of the cliffs and it suddenly came into my brain to re create it 

It is made entirely from the starter kit using the landscape plate


 I started by creating a square using the straight line in the middle of the plate
I then made another line next to it to make a border.  On the outside I created a row of dots with one of the accents on the plate mate.


Then I looked at the hill lines and decided which one to use for the top of the cliffs then I adjusted the parchment to make another line for the grass top

I used the sweeping line (under the straight one) for the base of the cliff then I used the line above the straight line as it the bump looked a bit like a wave so I just kept moving the parchment about to make my waves.

Added the moon and some birds from the plate mate accents.

I turned the plate around and used various lines to make crevices on the cliffs.


before I started the white work on the back I added some shadow with a SN pencil can't remember which one but it was a yellowy brown colour  and obviously green for the grass,  I didn't do too much,

The white work took several days I kept doing some then leaving it to rest until I thought I had gone far enough. At this stage I went over with a white pencil 

I pierced around the edge with a two needle tool and snipped around but you could leave it as a straight cut.


Monday, 4 January 2016

Groovi dt samples -Lily and Rosie


Did you watch Barbara Gray on the telly yesterday if so you will know already  but here's my very exciting news......

I have been invited to join the groovi design team how exciting is that!

Some of my  first  samples were on yesterday's show and Barbara told everyone my news.

I will try and blog them during the week.  


I used the nested octagons to make a frame I used lines 2 and 3 in  from the edge I then moved the parchment around to the middle of the straight edge and then went around line 2 again.

I then added Rosie followed by Lily as she is a little behind Rosie.  I added some of the accents on the Lily border plate.

I did some bits of white work, coloured in from behind with Spectrum Noir pencils .

I pierced all around the edge  then used my snippers to cut out

I used a circle cutter to cut out two mats and then mounted everything up 

Friday, 1 January 2016

Claritystamp challenge 35 - Say it with flowers


HAPPY NEW YEAR


 WELCOME 2016


What will it bring for us all I wonder?

I may just have some very exciting news - but cannot say just yet!!!!!!

Whatever happens I wish you health, wealth and much happiness.

I got a shiny new laptop for Christmas and this is my first blog post using it ....Windows 10 what a long way from Windows Vista!!! so far I am liking it and this new lappy is soooooooo much faster than my old one.


So its time for a new challenge  - say it with flowers - wouldn't it be lovely to see some flowers growing? - Roll on spring , and I am sure that all those poor victims of the terrible floods will be wishing it was here if only to assist in the drying out process!

As ever we had some fantastic projects for the last blog challenge so thanks if you entered and picking my top 5 was not easy - it never is there are many very talented crafters out there!


Here's my piece for this month 


I decided to try a triptych type of design - I hope you like it and I used the poppy plates the bird is from the the bauble border.

I started with the nested squares . decided which ones would fit three  across my parchment and the elongated them to give  me three panels. 


As usual I started out taking pics .....but then I forgot!


Here's what I came up with but then decided it needed a little something going on in the background


Enter the landscape plate from the starter set and the bird from the border

The little birds in the sky come from one of the little elements around the groovi plate mate

I added a border around the edge from the border plate 1

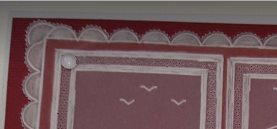
I started adding white work - now  I am not too good at this but I keep practicing - 


I then uses a two pronged piercing tool around the edge and then snipped around the edge.

mounted on to red card using some little white brads


Thanks for visiting and I look forward to seeing all your lovely entries x


Tuesday, 1 December 2015

A Christmas Story - Claritystamp challenge blog


Hello There!

Are you ready for Christmas?

Am I ready for Christmas?....am I heck as like... I still have a few cards to make and some presents to buy...but what to buy that is the question...and what to do for this blog challenge was another question .. Oh I will do some groovi as I have been doing quite a bit of that...but a couple of the DT have already beat me to it so I thought I would do craft card and white.


I saw a picture quite a time ago somewhere on facebook and I like the look of it .   I did do one last month for my Burnley workshop ladies so I thought I would carry on the theme


It is a very simple card really.


and as usual I forgot to take piccies except this one.

I started with the oval stencil and some craft card and put it through my cut n boss.
 I used some memento moonlight ink pad and torn paper for some hills  I used a blender then went over the edge directly with the ink pad.  I used a moon mask to whiten the moon.  I then put a straight edge across the middle....aka a pond!!

I used the tree range stamp and white embossing powder.

I was going to do it all in white but the kids throwing snowballs wouldn't have  shown up so I embossed them in black embossing powder.

I slight bent the word chain letters to fit more around the oval and the holly corners are made from two stamps that I have had for years and years  one is a corner stamp that is shorter on one edge and the other is just a tiny bit that you can add on.

I used a white gell pen to add the "grasses" at the edge of the pond and a squiggly line around the oval 

I stamped the wee snow man on a separate piece and cut him out ...just to add a bit in the corner.

I would like to wish you all a very Merry Christmas and a Happy New Year as the next time I blog will probably be in 2016

Thanks for taking the time to visit and leave your comments this year.

Sunday, 1 November 2015

Clean and Simple

Happy Sunday folks

It's the first of the month - so a new challenge on the Claritystamp challenge blog and the theme this month is clean and simple 

Easy peasy lemon squeezy.


At the time I was doing this card I was also prepping for a demo day over at the Crafty Company in Fleetwood so I was a bit busy but I had been sent a set of the new sparkle pens so I had to use them ----well it would be rude not to.

Anyway to the card in question as usual I forgot to take pictures as I went along.

Firstly I masked off a strip across the card and covered all the rest up with copy paper.  Next I made a couple of spray mists wit the colour burst powders in pink and blue and sprayed the middle of the card and left it to dry.

Out with the stamps and and I do like these cute little guys and  just the right size to go across the card.  Firstly I stamped the flowers randomly, then the birds - I used archival so it would run with the sprays and the pens that are also waterbased.  I started to colour in with the speccie pencils - and remembered to take a piccie!!


More colouring ensued but I didn't want to put down lots of colour as that would mean that there would be a big build up of wax from the pencils and I didn't want it to act as a resist .

Finally I stamped Harmony and then went over the flowers and birds with some crystal clear sparkle pen.

I am a rubbish photographer but I hope you can see the glitter on these birds 


I have since had more of a play with them and I likey!!

Looking forward to seeing your entries in this challenge