Oh My Word what an absolutely fantastic weekend I have had. Firstly it was the Happy Stampers show in Port Sunlight on Saturday - had an absolutely great day bought loads of nice goodies, some new stamps from Clarity and another from IndigoBlu I also got a lovely stencil/mask from Clarity and some from Andy Skinner and what I also got was my Gelli plate - can't wait to have a play with that whoop whoop watch this space. ( wont get time today though)
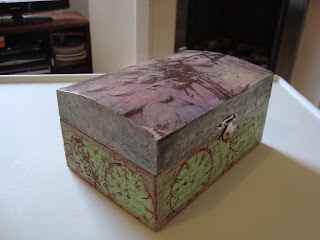
Then on Sunday I went to a workshop at the Stamp Pad in Greenfield where Gwen Fletcher was hosting a workshop run by Andy Skinner we did this amazing Image transfer box isn't it cool I love it.
It was a brilliant day and I loved every minute of it
Anyway the real reason for this blog is to say how I made this little ATC for a group I am in. We exchange an ATC every month to a specific person within the group and each month we have a theme. The them for May was texture and the only stamps we can use are Clarity ones.
So this is my offering which went to my friend Sam and I have been asked how I did it so here we go.
Firstly I sprayed some red dylusion on my card and dried it off. I then smeared some glue and seal over part of the card and scribbled into it with the pallet knife and allowed to dry. I then added a couple of squirts of blue dylusion and wiped it off. That way it didn't colour where the glue and seal was. I then put a mask over and put some embossing paste through the round holes and left to dry. when dry I put the mask back over and and coloured with some more of the red - I just picked it up from my mat and painted on so that it only coloured the dots.
I stamped two maple leaves from Clarity stamp onto the card and embossed with clear embossing then I drew around with a fine black pen. I stamped another and embossed with frantage gold enamel. I stamped another in weathered wood and one in cranberry embossed these with clear then cut them out and stuck on.
Finally I squirted some goosebumps on and left to dry.
And all that work for a piece of card 3.5 x 2.5 inches xx


7 comments:
Your ATC is fab Linda and it's great to read all of the techniques that went into creating it. I bet it's even more impressive in real life when you can really see all of the different textures. x
Thanks for sharing how to do this Linda, what a lot of work but it is so effective. Really love it.
Great stuff Linda both brilliant. xx
Hi Linda. We met at HSNW on Saturday and i said I'd look you up when I got back to Spain. I've been looking at your past blogs and you do some great stuff. Loving todays ATC.
I'll put you on my favourites and that way I can keep in touch. Good meeting you.
Love Val in Alicante x
Hi Val it was lovely to meet you and thanks for dropping by and leaving such a lovely comment. Looking forward to seeing your entry via email in the Clarity challenge blog ! :)
Hi Linda, first it was great to see you at Port Sunlight....and I do wish that I could have joined you at Andys workshop....the chest looks fantastic....
Your ATC is a brilliant representation of Texture...Sam is so lucky to have it...have a good weekend....Jo. X
Oh thanks for your kind comments Jo had a ball last weekend Port Sunny, Andy Skinner and then on Monday Ken Oliver from Spellbinders was demoing at my local craft shop yay.
Post a Comment